Материал: BASIC_SURGICAL_TECHNIQUES budapest
64.Sewing machines rejoin tissues by one or two layers of clips. Clips are pressed into an anvil on opposite side, clips become hooked. There are linear (some of them include also cutting edge) and circular sewing machines.
65.Suction system, hand part is going on towards a plastic tube, which is connected through a reservoir towards the central suction system.
66.For the drainage of the operating area using a scalpel a puncture must be performed. Abdominal Péan must be drawn through the abdominal wall, and plastic tube should be drawn from inside out. After positioning in the operating area drain must be sutured to the skin.
67.Lamp set: because it is sterile, operator can set the position of the operating lamp during operation.
68.Vascular prosthesis.
69.Hernia mesh.
70.Correct opening of sterile glove’s bandage. The outer bandage must be opened without touching inner bandage. Scrub nurse takes the inner bandage. Opening the inner bandage the two gloves can be seen.
96
3. Practice
Knotting technique and type of knots
During practice two types of knots will be introduced: Wiener knot and surgical knot must be learnt using both hands. For better visibility on “knotting table” thick threads in various colours will be used.
Wiener knot is fast to make and is suitable in case of less tension. Other hand surgical knot is strong and safe, that’s why it is appropriate in case of tension.
1.At first Wiener knot made by right and left hand will be demonstrated, after this surgical knot will be shown performed by right and left hand.
2.Wiener knot made by right hand: threads end is positioned in right hand between first and second finger ~ palm side is facing upwards ~ third, fourth and fifth fingers are lying side by side stretched ~ second finger is flexed maximally ~ the other end of the thread (held in left hand) must be laid on third finger ~ right third finger must be flexed and must reach the thread held by right first and second finger ~ this end must be grabbed by right hand third and fourth finger, while releasing it with first and second finger ~ thread must be drawn through the loop ~ knot must be pushed down by right hand second finger. At first 3 slow, than 5 quick made knots will be shown.
3.Wiener knot made by left hand: threads end is positioned in left hand between first and second finger ~ palm side is facing upwards ~ third, fourth and fifth fingers are lying side by side stretched ~ second finger is flexed maximally ~ the other end of the thread (held in right hand) must be laid on third finger ~ left third finger must be flexed and must reach the thread held by left first and second finger ~ this end must be grabbed by left hand third and fourth finger, while releasing it with first and second finger ~ thread must be drawn through the loop ~ knot must be pushed down by left hand second finger. 5 knots will be shown.
4.Knots will be shown made by right and left hand by turns.
5.Surgical knot made by right hand: threads end must be grabbed in right hand by the way that end is pointing towards fifth finger, while thread is held by flexed third, fourth and fifth fingers ~ right hand first and second finger are positioned to make “C – shape” ~ the other end of the thread held by left hand must be taken before right hand first finger ~ right hand second finger must take thread on first finger (both threads are surrounding right hand first finger, crossing each other) ~ thread must be laid by left hand on right hand first finger’s pad, while affixing it with second finger ~ it must be rolled in the appearing loop ~ knot must be pulled down by right hand second finger. 5 knots will be shown.
6.Surgical knot made by left hand: threads end must be grabbed in left hand by the way that end is pointing towards fifth finger, while thread is held by flexed third, fourth and fifth fingers ~ left hand first and second finger are positioned to make “C – shape” ~ the other end of the thread held by right hand must be taken before left hand first finger ~ left hand second finger must take thread on first finger (both threads are surrounding left hand first finger, crossing each other) ~ thread must be laid by right hand on left hand first finger’s pad, while affixing it with second finger ~ it must be rolled in the appearing loop ~ knot must be pulled down by left hand second finger. 5 knots will be shown.
97
7.Knots will be shown made by right and left hand by turns.
8.As repeating Wiener knot made by right and left hand, after it surgical knot made by right and left hand will be shown.
9.During the positioning of the knot it is necessary to guide the knot until endpoint by hand in order to make safely holding knot.
98
4. Practice
Sutures and suture materials, suture removal
Aspects of wound closure:
-Stitches should be placed about one cm from the wound edge in both side (usually stitches should be made toward us). Try to avoid suture materials to cut through tissues by placing them to close to the wound edge.
-Stitches should be placed the same distance from each other (c.a. 1 cm)
-Keep all knots on one side of wound.
-Stitches should take the identical part of the opposite side of the wound to avoid wrinkles and gaps.
-Avoid inverted wound edge (inverted wound edge will heal with thick scar)
-Stitches should be took the wound base in deep wounds to avoid dead spaces, where blood, seroma can accumulate.
-Avoid tissue ischemia by making the stitch to tight.
-Deep wounds should be closed more than one layer.
Exercise: make simple interrupted stitches with French needle and linen thread on skill model. Insert the thread into the French needle as we learned in practice 2. Elevate the far side of the wound edge with surgical forceps and stitch in the skin approx. 1 cm away from the wound edge. Softly grab the needle coming out in the middle of the wound and pull out. Avoid to harm the tip of the needle. Take the needle with hand and reinsert into the needle holder. Elevate the nearby wound edge and stitch from the middle of the wound and come out from the wound approx. 1 cm away from the wound edge. Stitches should be placed in one line and perpendicular to the wound. Pull out the needle from the skin with the needle holder and remove the thread from it. Take everything from our hands to the table. Make Wiener knots with alternate right and left hand. Place the knots away from the wound, foreign materials in the wound can disorder the wound healing. 3-4 knots should be enough. Pay attention to make the knots with a proper strength. If the knots are loose, they won’t hold the wound edges together. If they are too tight, they will cause tissue ischemia and necrosis. After knotting, hold the two threads together and cut them off, leave a small piece of thread behind (approx. 1 cm). Making the second stitch we make the same procedure, but we make surgical knots with alternate right and left hand. 3-4 knots will also enough. The distance between two stitch should be 1 cm. Removing sutures: elevate the thread or the knot with surgical forceps and the cut the thread between the skin and the knot.
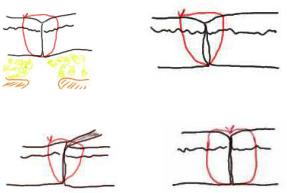
Bad suturing techniques:
Inverted wound edgesDead space in the wound
Unequal wound edgesKnot in the wound
99
5. Practice
Practicing of basic sutures on porcine tissue (interrupted stitches)
1. Simple interrupted suture
We create a 5-6 cm long incision on the liver skin-specimen. We put the needle into the needle-holder. We grab the opposite side of the incision with a surgical forceps, and start sewing 1 cm far from the wound edge. Catch the top of the needle with the needle holder and pull the thread through until there is only 2-3 cm is left outside the wound. Take care of the needlepoint and the cutting edge. Grab the needle with hand and position it correctly again into the needle-holder. Grab the closer wound edge with the forceps and sew out from the incision in 1 cm distance from the wound edge. The suture should be perpendicular to the incision line. Put the forceps on the table. Grab the longer end of the thread with the left hand (on which the needle is).Go around the needle holder with the thread catch the shorter end of the thread with the needle holder end finish the first instrumental knot. Position the knot on one side of the incision; take care not to place it in the middle because it inhibits the wound healing. Make further 3 or 4 knots. The advantage of the instrumental knot, that there are just a few threads is waste if you leave only 2-3 cm out of the wound at the beginning. Do the same process on the following suture. The stitches should be 1 cm far from each other.
Removing the suture: Hold the knot or one end of the thread with the forceps, and cut the thread just above the skin.
2. Vertical mattress stitch (so called Donáti-stitch, or vertical U-suture)
Fix the needle with the needle holder. Grab the opposite wound edge with the surgical forceps, and sew into the skin 1,5 cm far from the incision line. If the needle is hard to sting through, try to push from wrist. Catch the top of the needle with the needle holder and pull the thread through until there is only 2-3 cm is left outside the wound. Open the incision the view the wound base, and sew it too. Catch the top of the needle and pull it out from the wound. Take care of the needlepoint and the cutting edge. Grab the needle with hand and position it correctly again into the needle-holder. Grab the closer wound edge with the forceps and sew out from the incision in at least 1,5 cm distance from the wound edge. The next step is the so called backhand positioning of the needle. Grab again the closer wound edge, and sew into it 1-2 mm far from the edge. Catch the top of the needle with the needle holder, and pull it out. Fix the needle again into the needle holder, grab the opposite wound edge with the forceps and sew out form the wound the same, 1-2 mm from the edge. All the 4 points of the suture must be in one line, and perpendicular to the incision line. Get the needle out of the needle holder, and put the forceps on the table. Grab the longer end of the thread with the left hand (on which the needle is).Go around the needle holder with the thread catch the shorter end of the thread with the needle holder end finish the first instrumental knot. Position the knot on one side of the incision; take care not to place it in the middle because it inhibits the wound healing. Hold the two ends of the threads together and cut them together. Make further 3 or 4 knots. The advantage of the instrumental knot, that there are just a few threads is waste if you leave only 2-3 cm out of the wound at the beginning. Do the same process on the following suture. The stitches should be 1 cm far from each other.
Removing the suture: Hold the knot or one end of the thread with the forceps, and cut the thread just above the skin.
100