Материал: BASIC_SURGICAL_TECHNIQUES budapest
3.6. Scrubbing
Changing the clothes
Entry into the operating theater is allowed only in operating room attire and shoes worn exclusively in the operating room.
Surgical cap, face mask
The surgical team members should wear surgical caps and face masks before entry into the operating room. The cap should cover the hair completely. The mask should be tied securely.
Srubbing, surgical hand disinfection
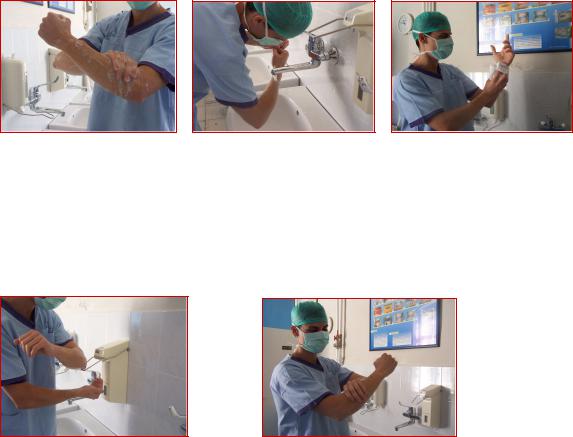
Surgical hand scrub should be done before any operation and sterile intervention. Hands can not be made sterile. The aim of the scrub is to reduce the number of transient and resident bacteria. The scrub eliminates the transient flora of the skin and blocks the activity of most resident germs located in the deeper layers. Nowdays, the scrubbing is carried out as in the Ahlfeld-Fürbinger 2- phase scrub. It consists of a mechanical cleansing followed by rubbing with a hand disinfectant.
Mechanical cleaning is the first phase of scrubbing. Wash the hands and forearms (up to elbow) thoroughly with the soap and warm tap water. The first phase should last till that time when we are satisfied of a thorough and careful washing (it does not have a time limit). After this, use a tissue paper to make your hands and forearms dry (Figure 2.).
Figure 2. The first phase of the surgical hand scrub
The second phase is hand disinfectining. Rub with a disinfectant hand scrub agent for 5 × 1 minutes. The disinfected area should extend to the elbow. The unwashed skin should not be touched with the clean hands. This process should be repeated four times more, but the affected area will be smaller and smaller. The second time, the dividing line is at 2/3 of the forearm; the third time, it is on the middle of the forearm; and the fourth time only 1/3 of the forearm is involved. With the fifth dose we rub only the wrists and hands (Figure 3.).
Figure 3. The second phase of the surgical hand scrub
16
The assistant -after scrubbingenters the operarting room and does the disinfectioning of the surgical territory. The surgeon enters the surgical suite immediately after the scrub. The hands are held above the elbows, in front of the chest to avoid touch any non-sterile object. After scrubbing, there is a need for an immediate gowning.
The gowning procedure
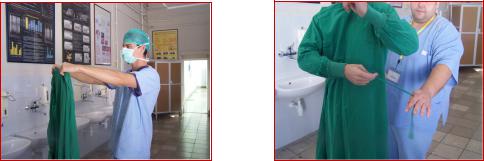
1.Lift the gown while you are grasping its middle part. Catch its neck piece. While keeping it away from your body, allow it to unfold.
2.Find the neck line and while holding the gown at this area unfolds it in a way that it’s inner part is facing you. Turn the armholes towards yourself.
3.While holding the neck parts of the gown throws it up in air just a little and with a defined movement insert both arms into the armholes.
4.The assistant/scrub nurse stands at the back and grasps the inner surface of the gown at each shoulder. The gown is pulled over the shoulders and the sleeves up over the wrist. Meanwhile the cuffs of the gown can be adjusted. If there is a band, use it to fix the cuff. The assistant ties the bands at the back of the gown. Then, with your right hand catch the strile right band located at the waist region of the gown and while crossing your (right) arm give this band to the assistant who grasps it without touching the gown and tie it at the back. It is important to know that these parts of the gown which are touched by the non-sterile assistant will loss their sterility and should not be touched by you (Figure 4.).
Figure 4. Wearing a surgical gown
Gloving
Gloving is assisted by a scrub nurse already wearing a sterile gown and gloves. Rules of glowing: the scrub nurse holds the glove towards you in a way that the plam of the glove is facing you. In our institute it is customary to wear the left hand glove first. In this case, put two fingers of your right hand into the opening and pull the inner side of the glove towards you. Slip your left hand into the glove. Then, with your gloved left hand catch the outer side of the right hand glove - which is now kept in front of youto open it. Thrust your right hand into the glove. After both your hands are gloved you may then adjust your gloves so that they fit comfortably on the hands (Figure 5.).
17
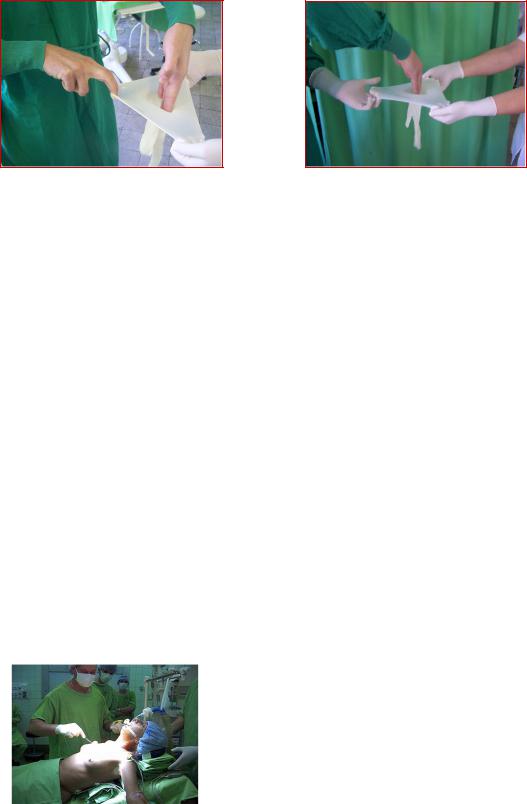
Figure 5. Gloving
3.7. Preparation of the surgical area
Bathing
It is not unequivocal that bathing lowers the germ count of the skin, but as regards elective surgery preoperative antiseptic showers/baths are compulsory. This should be done with antiseptic soap (chlorhexidine or quaternol) the evening prior to the operation.
Shaving
It must be done immediately prior to the operation, with the least possible cuticular/dermal injury; in this case, the wound infection rate is only 1%. Clippers or depilatory creams reduce infection rates to < 1%.
Preparation of the skin
Most commonly used disinfectants are: 70% isopropanol, 0,5% chlorhexidine (a quaternary ammonium compound), and 70% povidone-iodine.
Disinfectioning and scrubbing of the surgical area
This is performed after the surgical hand scrub and before dressing. Scrubbing is performed outward from the incision site and concentrically. The prepped/disinfected area must be large enough for the lengthening of the incision/insertion of a drain. Based on the applied general regulations, Povidone-iodine (e.g. Betaisodona or Betadine) or alcoholic solutions (e.g. Dodesept) are applied 3 consecutive times. In aseptic surgical interventions the procedure starts in the line of the planned incision moving outwards in a circular motion, while in septic and infected operations it starts from the periphery toward the planned area of the operation. An area already washed is not returned to with the same sponge (Figure 6.).
Figure 6. Disinfectioning of the surgical area
18
Isolation of the operating area (draping)
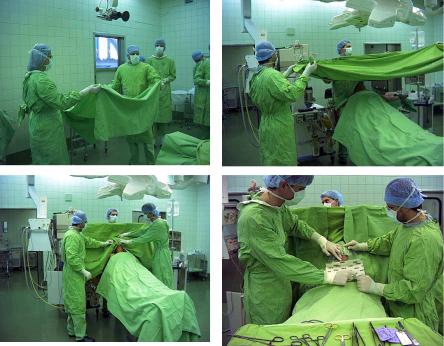
After the skin preparation, the disinfected operating area must be isolated from the nondisinfected skin surfaces and body areas by the application of sterile linen textile (muslin) or sterile water-proof paper drapes and other sterile accessories/supplements. The main aim of isolation is to prevent contamination originating from the patient’s skin. The isolation is generally done with the help of 4 pieces of the disposable sterile sheet, nondisposable permeable linen textile, or paper drape (the self-attaching surfaces of these latter, fix them to the patient’s skin). In general surgical operations (e.g abdominal operations), the scrub nurse and the assistant use a specially folded first sheet (big sheet) to isolate the patient’s leg. The second sheet (horizontal sheet) is used to isolate the patient’s head. This sheet is fixed to the guard. Placement of the two side-sheets then follows. The isolated area is always smaller than the scrubbed area. After being placed on the patient, sheets can not be moved toward the operating area. Four Backhaus towel clips will fix the isolating sheets to the patient’s skin at the surgical territory. The sheets are fixed to each other, to the gaurd, and to the Sonnenburg’s table with towel clips (Figure 7.).
Figure 7. Isolation of the surgical area
19
4. BASIC SURGICAL INSTRUMENTS, SUTURE MATERIALS, SUTURING
TECHNIQUES
4.1. Basic surgical instruments and their use
Surgical instruments are precisely designed and manufactured tools. They can be either disposable or non-disposable (e.g. reusable, resterilizable). The non-disposable tool must be durable, and easy to clean and sterilize. They should withstand various kinds of physical and chemical effects, namely body fluids, secretions, cleaning agents, and sterilization methods (e. g. high temperature and humidity). They are generally made of high-quality stainless steel. Chromium and vanadium alloys ensure the durability of edges, springiness and rustlessness. Some of these instruments are invented thousand years ago, but those which are invented in the last century have gone through developmental changes which made them suitable for present purposes. Instruments used in minimal invasive surgery were invented in the last 20 years, but they have gone (and are still going) through developmental changes according to our everyday demands. So the contemporary instruments are lighter, more aesthetic, and long-lasting.
Most everyday interventions can be performed with relatively few instruments which should be handled correctly. In many cases, not the lack of an instrument or the instrument itself is the cause of an unsuccessful intervention but the surgeon! So we should look for the cause of an unsuccessful operation first in ourselves and not in instruments.
Due to the constant improvements by surgeons and manufacturers, the number of instruments is so big that only their basic categories and the main representatives can be surveyed. Depending on their function, basic surgical instruments can be categorized into six groups. Some instuments (e.g. Péan) can have many functions. In such cases we categorize that instrument into only one of these six categories.
These six groups are as follows:
1.Cutting and dissecting instruments,
2.Grasping instruments,
3.Instruments used for hemostasis,
4.Retracting instruments,
5.Tissue unifying instruments and materials,
6.Special instruments.
4.1.1. Cutting and dissecting instruments
Their function is to cut or dissect the tissue and to remove the unnecessary tissues during the surgery. Scalpels or scissors are most frequently used instruments for these purposes. The following instruments also belong to this category: hemostats used to prepare the tissues, dissectors, diathermy pencil (monoor bipolar diathermy or electrocautry), amputation knife, saws, and raspatories.
Scalpels
During the tissue dissection scalpels cause minimum traumatization of the tissue. Nowdays, instead of the conventional scalpel, disposable scalpels with a plastic handle or scalpels with a detachable blade are most commonly used. A disposable blade is attached to the resterilizable metalic handle before the operation (Figure 8.). It is used for 1) making an incision on the skin, 2) dissecting the connective tissues, and 3) preparation of a scarred tissue.
20